
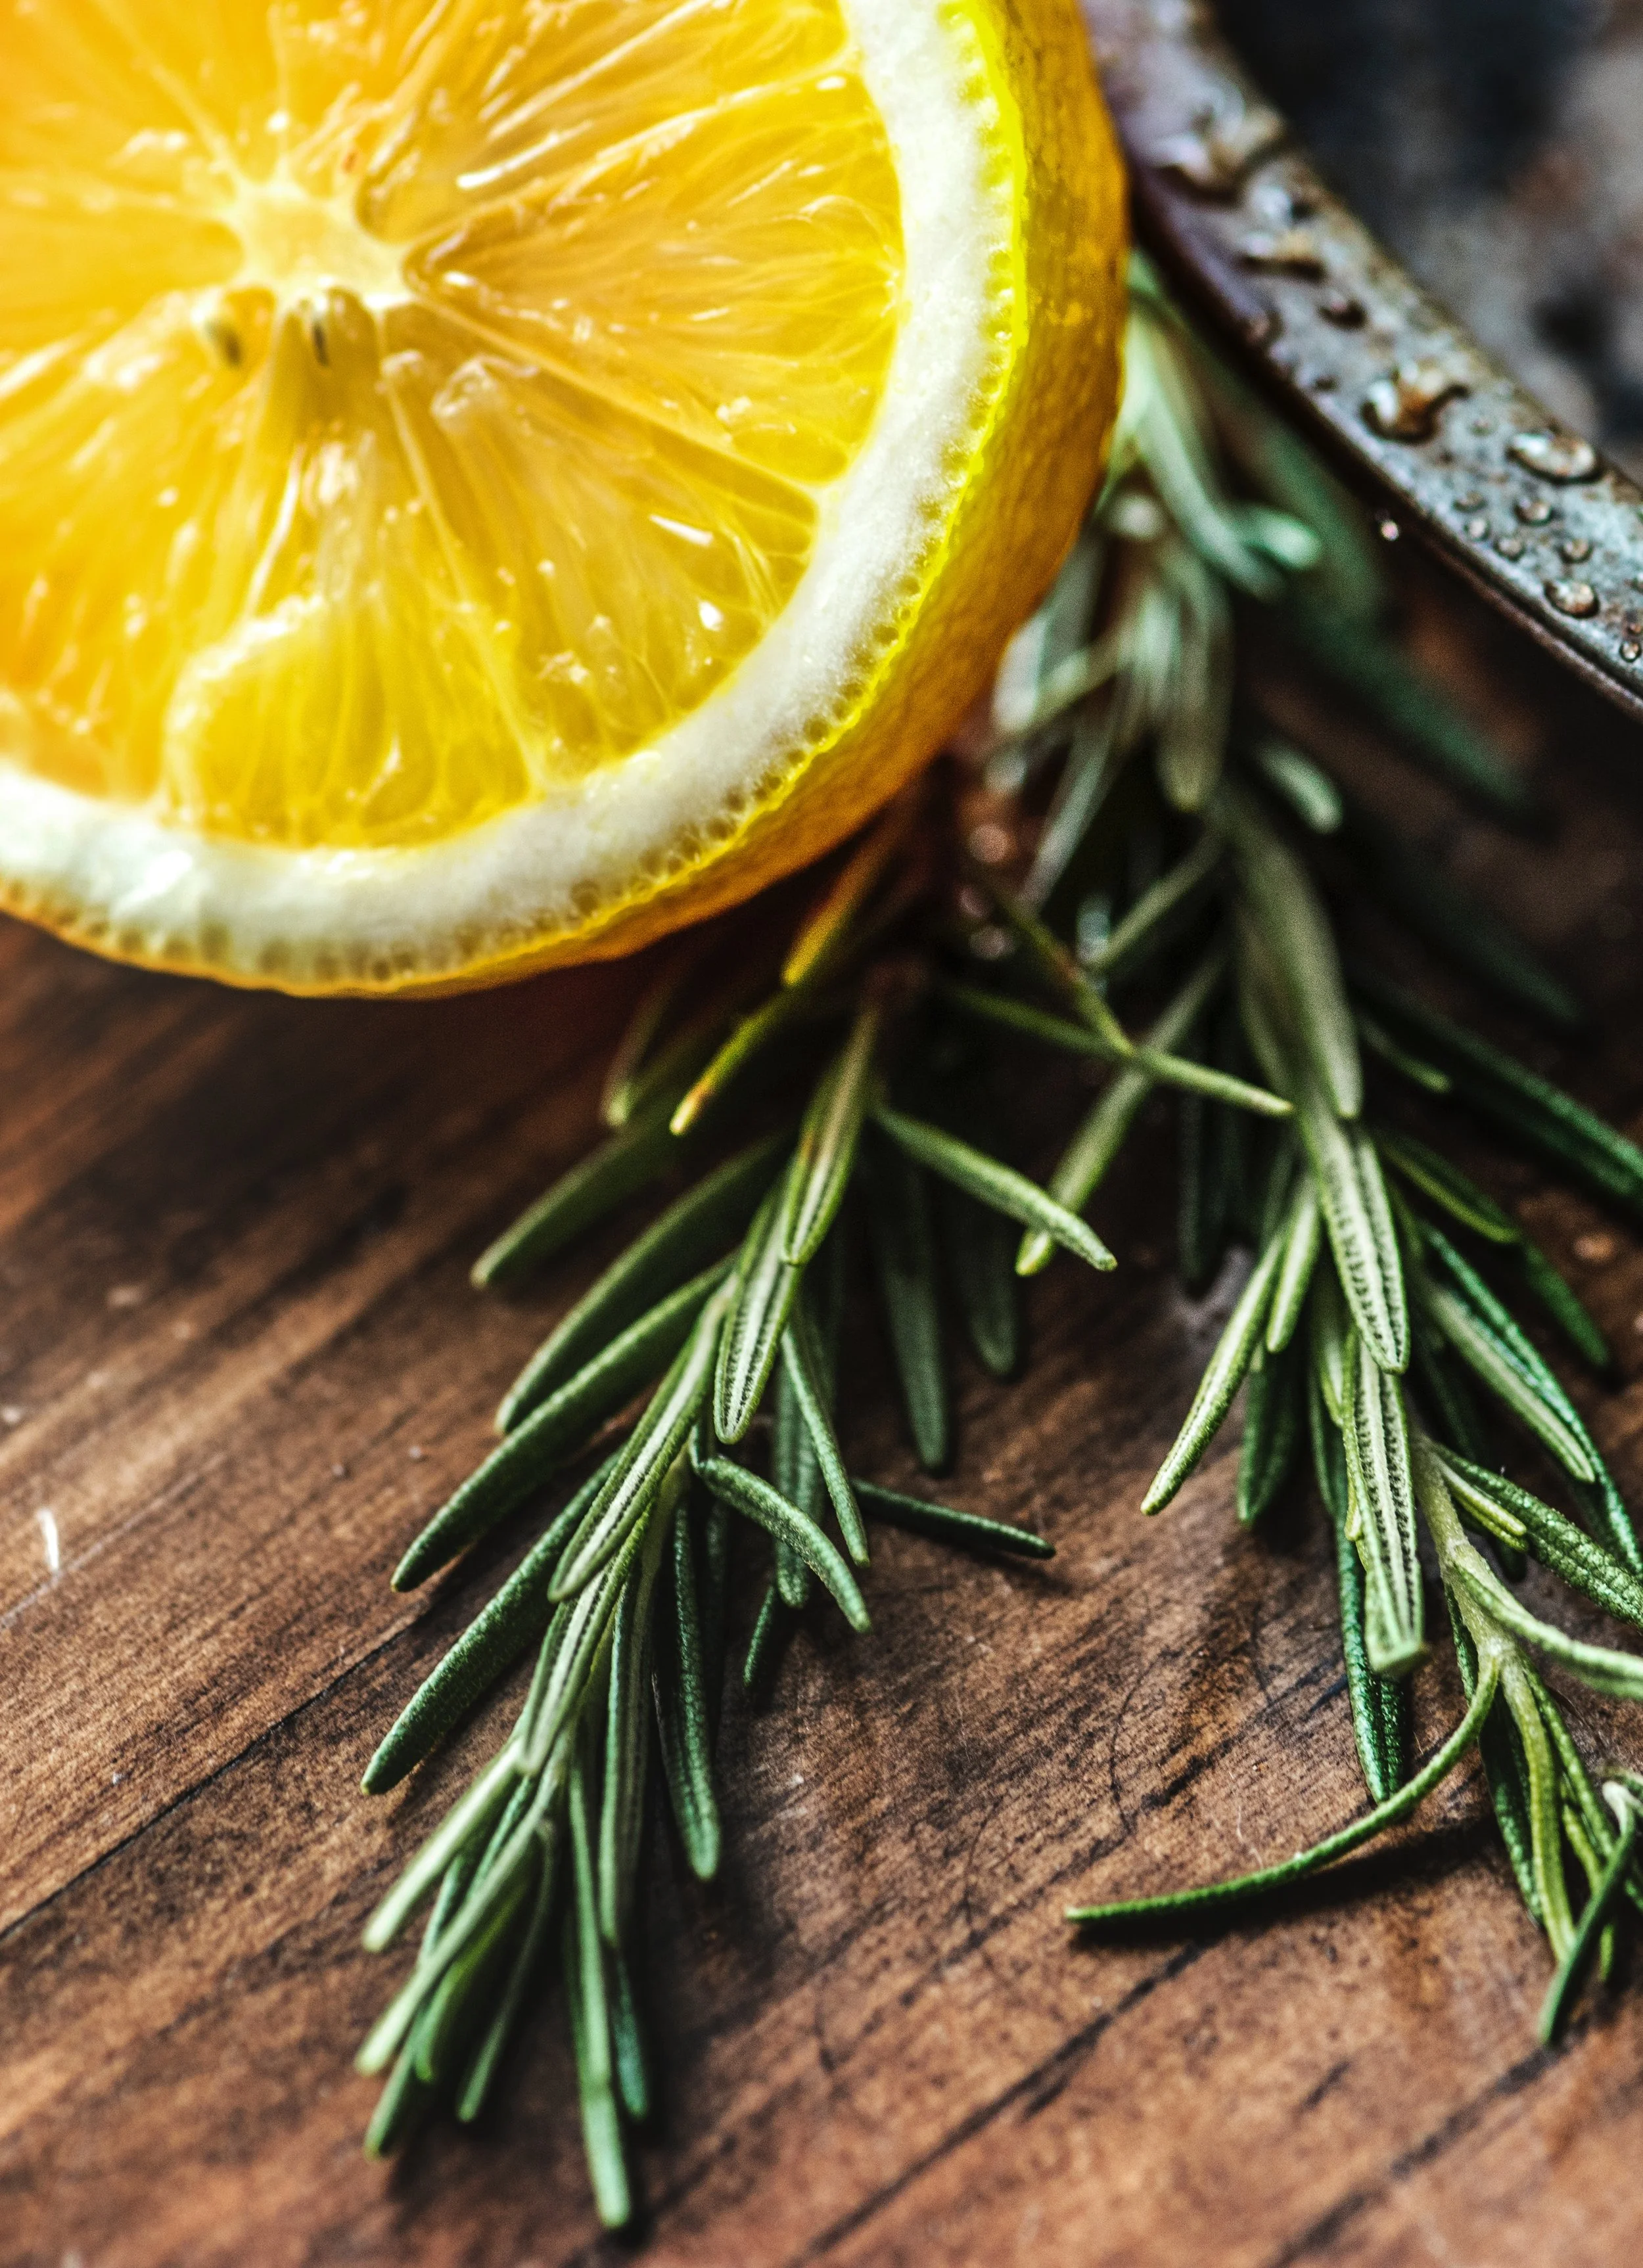
Orange Spiked Cold Brew
Add orange slices to the grounds while you steep your cold brew for a citrusy coffee treat. Add more slices right to the cup, too. It’s my favorite citrus season morning ritual!

It’s peak citrus season as I write this and I can’t buy the oranges fast enough. I buy four and they’re gone in a day. So I buy eight and they’re gone in a day. I’ve taken to hiding a couple for myself (I’ll never tell where) so that I can make my new favorite later winter coffee: cold brew spiked with oranges.
In this version, I steep the whole batch of cold brew with sliced oranges and then add a couple of slices to the glass in the morning. It’s a bonus treat to eat the coffee-soaked oranges at the end.
This along with a couple of rounds of this solitaire scrabble game we found online makes for a delightful quiet morning ritual.
Gather your ingredients
32 oz mason jar and cloth filter (we use our original cold brew kit)
6 oz of course ground coffee of your choice
2 whole navel oranges, or citrus of your choice, scrubbed
Waterto fill
Make your orange cold brew concentrate
These instructions are for a concentrated cold brew. That means you’ll want to add water when you serve it. See “To Serve” below.
Wet your cloth filter slightly and place inside the jar, wrapping the top of the filter around the top of the jar (see image below).
Cut one of your oranges into 4-6 wedges. Save the other for serving.
Alternate adding the ground coffee and orange slices so that the slices are mixed into the grounds.
Slowly add just enough cool water to wet all the grounds. But don’t fill the jar yet!
Allow the wet grounds to sit for 30 seconds or so. This “blooms” the coffee.
Finishing adding cool water, tying off the top of the filter.
Add a lid to your jar and let the brew steep for 9-12 hours in the fridge.
Remove the filter and compost the used grounds and orange slices.
To serve
Pour 3 ounces of cold brew concentrate into a glass and add three ounces of cold water.
Serve with ice and an orange slice or two.
Enjoy!

Spike your cold brew
Add citrus, cinnamon, or your favorite herbs and spices right to the grounds while it steeps!
Citrus herb healing tonic
Whether it’s the sniffles, a scratchy throat, or something a bit more existential, we could all use a healing brew from time to time. This adaptable recipe uses the fruit and herbs you have on hand—or your favorites from the produce aisle—to create a powerful concentrate to keep in your fridge. Just heat the kettle and add hot water any time you need a soothing boost.
A tonic to heal body and soul
Bring the zing of late fall fruit and medicinal strength of your favorite herbs to this warming tonic.
Whether it’s the sniffles, a scratchy throat, or something a bit more existential, we could all use a healing brew from time to time. This adaptable recipe uses the fruit and herbs you have on hand—or your favorites from the produce aisle—to create a powerful concentrate to keep on hand in your fridge. Just heat the kettle and add hot water any time you need a soothing boost.
Gather your ingredients
3 whole lemons and limes—any combination
1 whole orange, scrubbed
2 tsp ground turmeric
1, 2-inch piece ginger
Several fresh herb spring—we like 5 sprigs of rosemary, but use your favorite flavors
One 32-oz CoffeeSock cotton filter, cheesecloth or mesh seive
Hot water and honey, for serving
Make your tonic concentrate
The core recipe produces a concentrate you can store in your refridgerator for up to one week.
Wash and thinly slice the lemons, limes, orange and ginger. No need to peel any of it.
Place it all of the fruit—set the ginger aside for now—in a medium pot with 8 cups of water and the turmeric.
Bring to a boil, then reduce heat and simmer for 10 minutes.
Remove from heat and add the ginger slices and whole herb sprigs.
Cover the pot and steep the ingredients together for at least 10 minutes and up to 20.
Strain the concentrate through your CoffeeSock filter into a mason jar or other pourable container with a lid.
Use immediately (see instructions below to serve) or add an airtight light and store in your fridge.
Serve your tonic
To serve and drink your tonic:
Add a 2 ounce pour into a mug.
Top with hot water from the kettle. You can dilute as much or little as you like. We typically add about 4 ounces of hot water, but you can add more concentrate or less water if you want a stronger flavor.
Sweeten with honey to taste.
Simple Cardamom Coffee
People have added cardamom to their coffee since at least the 16th century. So how did I just fall in love with the combo recently? This simple pour over recipe is highly adapable. Combine with additional spices or citrus rind, add milk or sugar and enjoy this timeless taste combo.
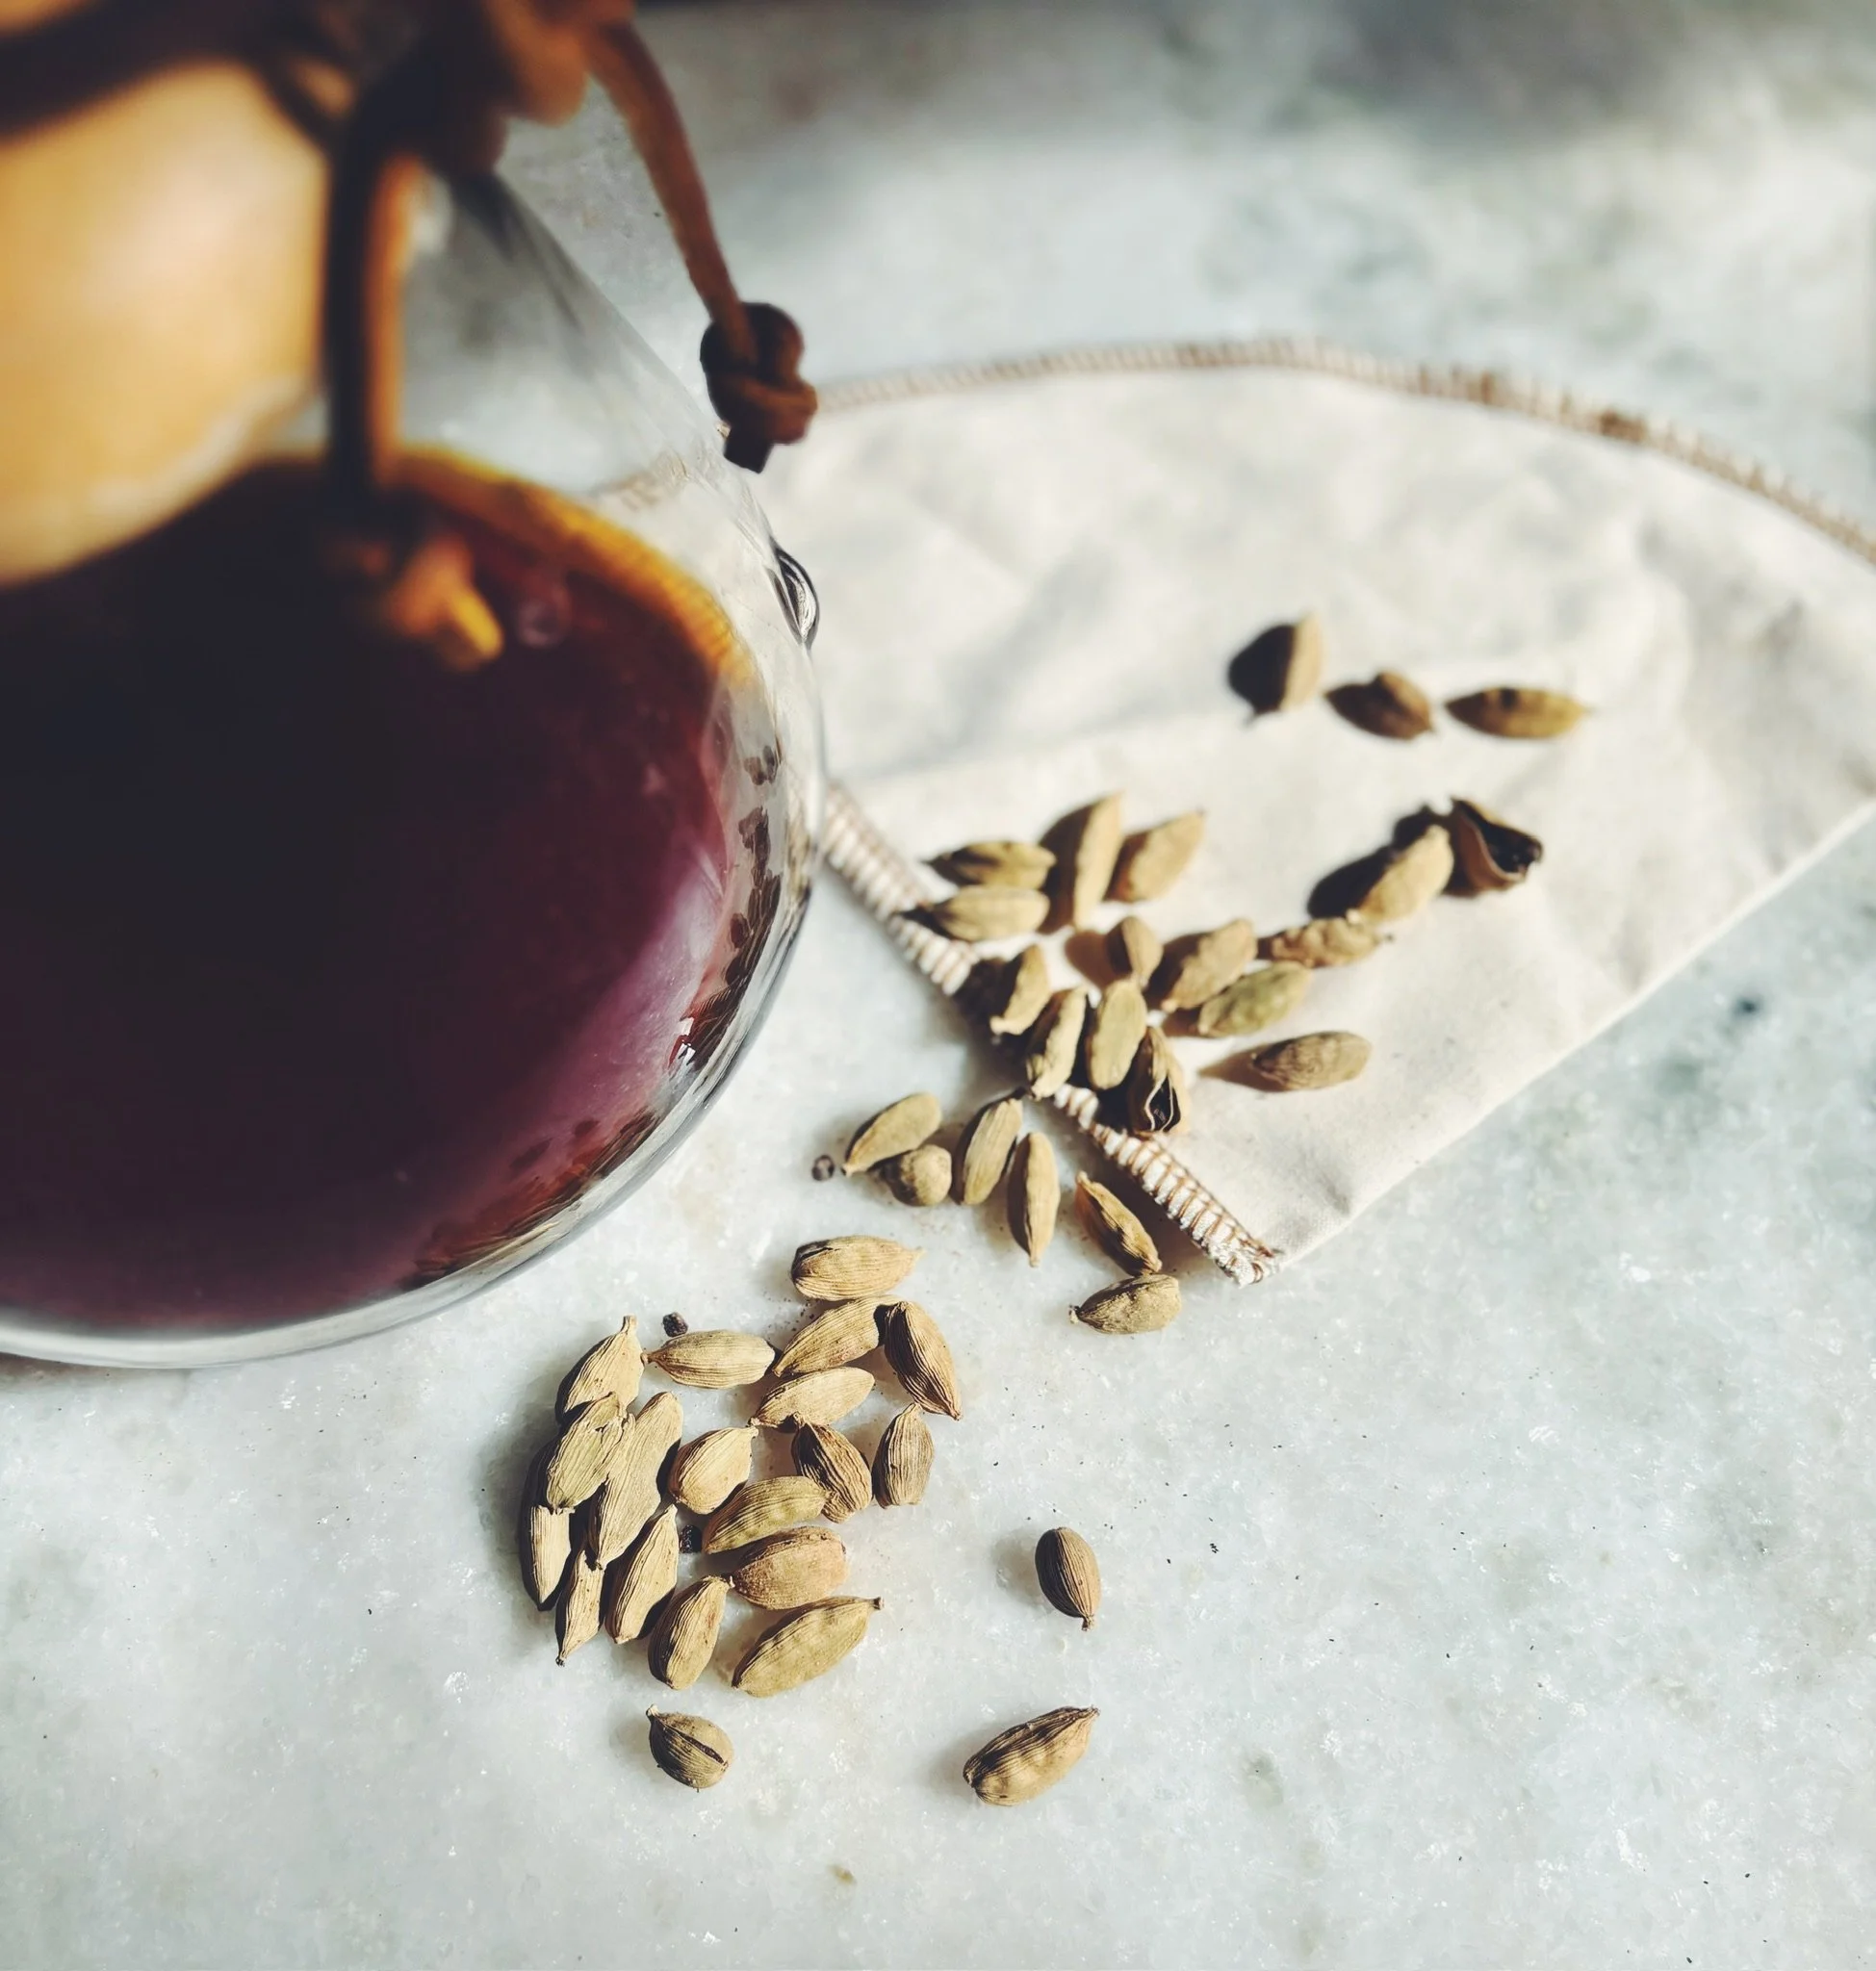
People have added cardamom to their coffee since at least the 16th century. So how did I just fall in love with the combo recently? I guess I’m a late bloomer, at least where spiced coffee is concerned.
The people of the middle east have valued cardamom or its aromatic warmth as well as its digestive and medicinal properties. And yes, it’s delicious.
This simple pour over recipe is highly adapable. Combine with additional spices or citrus rind, add milk or sugar and enjoy this timeless taste combo.
Gather your ingredients
This recipe makes 4 cups, but you can adjust to your liking.
The basics
60 grams of ground coffee
1-2 tsp of ground cardamom
950 grams of water
Optional additions
Additional spices, your choice!
Orange zest
Brown sugar
Milk of choice
Make your coffee
Combine ground coffee and ground cardamom.
If using, add additional spices and your citrus zest.
If using a pour over method, heat water to boiling in a kettle.
Using your brew method of choice—we love our Chemex (instructions here), brew the hot coffee. For pour over, wet the grounds with 100 grams of hot water and allow to “bloom” for several seconds before pouring the rest of the water.
Divide hot coffee into cups and add brown sugar and milk, if using.
Our Favorite Slow, Sourdough Recipes
Sourghdough making is a slow art and patient science. It’s a process that won’t be rushed. In a world where time often feels scarce and patience is in short supply, who has time to spend on a days-long process of bread making? And yet, when life whispers at me to hurry. When the weight of all the undone tasks settles on my chest—that’s my cue to turn towards slowness. That’s my cue to crack open the starter and set to work on a loaf.
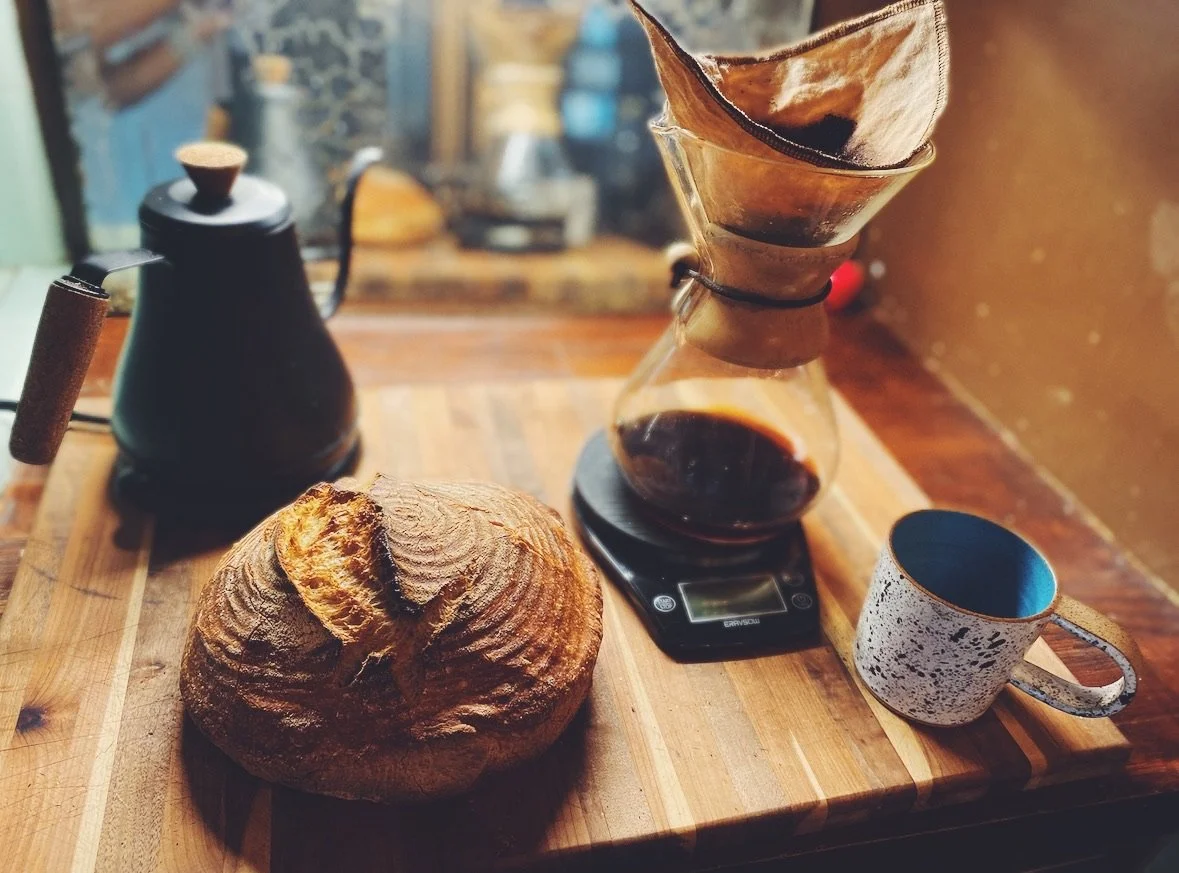
Sourghdough making is a slow art and patient science. It’s a process that won’t be rushed. In a world where time often feels scarce and patience is in short supply, who has time to spend on a days-long process of bread making?
And yet. When life whispers at me to hurry. When the weight of all the undone tasks settles on my chest—that’s my cue to turn towards slowness. That’s my cue to crack open the starter and set to work on a loaf.
Sourdough—the Ultimate Slow Food
When I’m making bread, there’s no better reminder that time pressue, for the most part, is completely made up. In fact, when I pause and breathe and give things their due time and attention, magic happens. In sourdough making, flour, water, and wild yeast come together in a living, breathing starter that thrives on patience and attention.
Every feeding, every rise, every bake becomes an opportunity to notice, to wait, and to savor. And when the time is right—there’s warm bread for all.
Our Favorite Recipes & How-Tos
Whether you’re brand new to sourdough or looking to expand your repertoire, we’ve gathered our favorite recipes and resources to help you enjoy the journey.
How to Create Your Starter
Before you bake bread, you’ll need a thriving sourdough starter. Think of it as the heart of your sourdough practice.
Beginner’s Guide to Sourdough Starter — A step-by-step explainer from The Perfect Loaf, clear enough for total beginners.
How to Make a Sourdough Starter — The ever-reliable King Arthur Baking method, complete with troubleshooting tips.
Gluten Free Starter — Did you know you can make a gluten free starter? You can!
Our Favorite Sourdough Bread Recipes
Once your starter is strong and bubbly, it’s time to bake. These three recipes stand out for their clarity, reliability, and beautiful results.
Basic Sourdough Bread — The Clever Carrot’s approachable guide makes artisan bread possible for beginners, with a chewy crumb and golden crust.
Everyday Sourdough — This “house loaf” from The Perfect Loaf is a reliable staple with just the right balance of tang and texture.
Whole Wheat Sourdough — For a heartier, more nourishing loaf, King Arthur Baking combines whole wheat flour with sourdough’s natural depth of flavor.
Gluten Free Sourdough — We highly recommend the new book The Art of Gluten Free Bread, by Aran Goyoaga of Cannelle et Vanille fame. Sign up for her newsletter while you’re at it.
Don’t Toss Your Discard
I try to keep the smallest possible starter to avoid the issue of too much discard, but discard happens. Instead of throwing it away, turn it into deliciousness.
Sourdough Discard Pizza Crust— This is my go-to way of using up discard. It’s super easy and we always have pizza dough in the freezer or fridge for a quick dinner. I like to spread the dough super thin on a large sheet pan and top with whatever veggie and sauce we have available.
So Many Discard Recipes — Am I cheating by listing King Arthur twice for discard recipes? Maybe, but this collection has produced some reliably yummy results. So, choose your own adventure! (And the pizza dough was worth its own call out.)
Slow Bread, Slow Life
Sourdough isn’t just about bread—it’s about presence. And realy, really good bread.
The hours of waiting, shaping, and resting bring a rhythm of patience that modern life too often lacks.
So feed your starter, let it rise, and when the time comes, pull your loaf from the oven and try to savor it as slowly as you made it.
Honey-Cinnamon Simple Syrup
What if your honey was simple to squeeze into your coffee and dissolved easily in your cold brew? And what if it was spiked with cinnamon, too? Check out this spiced and honeyed twist on traditional simple syrup—naturally sweet, and pollinator-friendly.

What if your honey was simple to squeeze into your coffee and dissolved easily in your cold brew? And what if it was spiked with cinnamon, too?
Yeah, we’re pretty excited, too. It’s a spiced and honeyed twist on traditional simple syrup—naturally sweet, and pollinator-friendly.
Speaking of pollinators, we’re celebrating our friends the bees and bats and butterflies and beeltes! Check out the blog.
Gather your ingredients
1 cup water
1 cup raw honey (local if possible)
2–3 cinnamon sticks
Optional: 1/2 tsp vanilla extract for extra depth
Make your simple syrup
Simmer the cinnamon: In a small saucepan, combine water and cinnamon sticks. Bring to a gentle simmer over medium heat and let it simmer for 10 minutes. This helps the cinnamon fully infuse.
Add the honey: Reduce the heat to low. Stir in the honey until fully dissolved—do not boil, as high heat can degrade some of honey’s natural goodness.
Steep + cool: Remove from heat and let the syrup steep with the cinnamon sticks in it for another 15–20 minutes for maximum flavor. If you like it stronger, leave the sticks in while it cools completely.
Strain + store: Remove the cinnamon sticks and pour the syrup into a clean glass jar or bottle. Your syrup will last for weeks in the fridge or on the counter.
How to use your honey-cinnamon simple syrup
Stir into iced or hot coffee
Sweeten your chai or herbal tea
Add to cocktails (try it in an old fashioned or hot toddy)
Drizzle over pancakes, oatmeal, or roasted fruit
🐝 Bee-Friendly Tip:
Opt for raw, local honey when possible—not only does it offer rich, floral flavor, but it supports nearby beekeepers and keeps our pollinator communities buzzing.
Sip slow, sweeten naturally, and let the cinnamon warmth carry you through the seasons.
DIY Muesli
Overnight muesli is our favorite quick breakfast. It’s healthful, hearty, fast, and super customizable. Use your favorite fruits and nuts and change up the ratios to please your palate!

They say breakfast is the most important meal of the day, and yet when we find ourselves in a rush, it’s also the meal we’re most likely to rush through or skip altogether.
Enter this DIY muesli. It’s healthful, easy to turn into overnight oats or a quick breakfast cereal, and it’s super customizable. Use your favorite fruits and nuts and change up the ratios to please your palate!
Gather your muesli ingredients
Makes 4 - 8oz individual servings
2 cups of rolled oats
1/4 cup of nuts each (I like sliced almonds and crushed walnuts)
1/4 cup of shredded coconut
1/4 cup total of seed mix (hemp, flax, chia)
1/3 cup of dried fruit (I prefer cherries and blueberries)
1 tsp salt
Mix the muesli
Mix all the ingredients together and store in an airtight container until ready to use.
To make muesli cups
In four individual bowls or mason jars, mix the following into each one:
1/4 of the muesli mixture
1 tbsp almond butter
1 tsp maple syrup
Enough milk to cover the muesli and have a bit more on top (I like coconut or almond milk)
Soak in fridge for at least 1 hour to overnight and up to 3 days.
Stir/shake before you eat.
Corina's foraged pecan pie
There’s nothing quite like the feeling of creating a treasured, seasonal treat from pecans you’ve foraged yourself. If you’re lucky enough to live where the trees shower you with these gifts each fall, grab a sturdy nutcracker and go wild! This pie subs maple syrup for corn syrup and yes, it’s delicious with store-bought pecans and a gluten-free crust, too!

It thrills me every fall—trees throughout our neighborhood rain food, covering bits of yard and sidewalk with ready-to-eat pecans. Nourishment is right here, in abundant clusters underfoot and dangling in clusters from trees.
It’s such a wonder that we wrote a blog about it! Check out The nourishment of pecans and then gather your own small harvest for our corn-syrup-free version of a classic pecan pie. We also chose a gluten free crust for the wheat sensitive among us.
Gather your ingredients
1 pie crust of your choice—we use a store-bought gluten-free crust, but you can sub in your favorite recipe or store-bought crust
6 tablespoons unsalted butter
1 cup pure maple syrup
1/4 cup of packed brown sugar
1/2 tsp of sea salt
2 cups pecan halves
2 teaspoons vanilla extract
3 large eggs
Make your pie!
Preheat oven to 350 degrees
Place pecans on a cookie sheet and toast in the oven for about 10 minutes or until lightly brown. Set aside to cool.
Once cool, roughly chop half of the pecans. (This step is optional, but we like the texture of some smaller and some larger pecans in the pie.)
In a saucepan over medium heat, melt the butter. Add brown sugar and maple syrup, whisking until smooth and combined. Bring to a low simmer, then remove from heat and let cool for about 15 minutes.
In a large bowl, whisk together the eggs, salt, and vanilla extract. Gradually add the cooled syrup mixture to the egg mixture, whisking continuously to combine.
Stir in the chopped pecans.
Pour the filling into the prepared pie crust.
Bake in the preheated oven for 40 minutes. If you check and see the crust getting too brown, you can loosely tent the pie with foil before it finishes cooking.
Remove from oven and let cool completely on a wire rack. The filling will continue to set as it cools.
Sprinkle with flaky sea salt before serving.
Serve at room temperature or slightly warmed with vanilla ice cream or whipped cream.
Champurrado Con Café
For warm beverage season, try a Mexican Champurrado. A Champurrado adds chocolate to the traditional Mexican Atole—a thick and creamy beverage made with corn masa and milk and spiked with cinnamon. This version adds a little coffee to the mix.

What is it about shorter days and chill breezes that demands steamy, cinnamon-spiked beverages? Let a single leaf turn burgundy and float to the ground and all we want is hot chocolate, the thicker the better.
When it comes to thick, creamy, and rich, Champurrado fits the bill. It’s the chocolate version of Mexican Atole—a rich beverage made with corn masa.
If you’ve never tried it, let this be your invitation. I wasn’t so sure about a corn-based drink when I first learned about it. But one sip made a convert out of me.
This version spikes the recipe with coffee for a mocha kick. But if it’s late and you want to go caffeine-free, you can substitute water for the coffee and it will still be exceptional.
Gather Your Ingredients
Makes 4 big cups
½ cup of Masa Harina
4 oz of dark chocolate, preferably Mexican chocolate, broken into pieces
1 cup of strong-brewed coffee—cold brew would work great here. It doesn’t have to be hot.
2 cups of milk—oat milk or whole work best because of their creaminess
1 cup of warm water, plus more to adjust thickness
1 cinnamon stick (or ground cinnamon to taste)
2 tablespoons brown sugar, plus more to taste
A pinch of salt
Make the Champurrado
In a small bowl, whisk together the masa harina and 1 cup of warm water until smooth and free of lumps. Set aside.
In a medium saucepan, combine the brewed coffee and cinnamon stick. Bring to a simmer over medium heat.
Add the chocolate to the coffee mixture and stir occasionally until the chocolate is fully melted. Then add the brown sugar and stir to dissolve.
Gradually whisk the prepared masa harina mixture into the coffee and chocolate mixture, ensuring no lumps form. Continue to simmer and whisk constantly to prevent burning.
Pour in the milk and continue to stir occasionally. Bring the mixture to a low boil, then reduce the heat to a simmer. Let it cook for about 15-20 minutes, or until the mixture thickens to your liking.
If the champurrado becomes too thick, you can thin it out with a little more coffee or water. If it needs more sweetness, add additional sugar to taste.
Remove the cinnamon stick, then add a pinch of salt and stir.
Use a molinillo (traditional Mexican whisk), an immersion blender, or a wire whisk to froth the champurrado to your desired consistency. Pour the champurrado into cups and serve hot.
Orange Mint Iced Tea
It’s March—that magical time of year when citrus season meets iced beverage season. Grab a bouquet of mint and a few navel oranges while they’re at their juiciest, and celebrate the official start of Spring with this lightly sweet and very orangy treat.

It’s March and you know what that means, right? It’s that magical time of year when citrus season meets iced beverage season—at least here in Texas where the days are already heating up and the navel oranges are at their juciest, piled high at the local grocery.
Nab a few oranges and a bouquet of mint and celebrate the official start of Spring with this lightly sweet and very orangy treat.
Orange Mint Iced Tea
Gather your ingredients
Makes enough iced tea for about 6 cups.
6 tsp loose-leaf black tea of your choice (Assam, Earl Grey, and Orange Pekoe all work great here)
CoffeeSock tea sock or other tea infuser
1 lg or 2 sm navel oranges (enough to make about one cup of juice)
1/2 cup mint simple syrup made with:
1/4 cup mint leaves
1/2 cup of sugar
1/2 cup water
6 cups of water for the tea; keep one cup cold.
Ice to serve
Make the mint simple syrup
Heat 1/2 cup water in a small pan on the stove until simmering.
Run the mint leaves between your palms to very lightly smush them and release the oils.
Once the water is simmering, add 1/2 cup sugar and stir to dissolve.
Once dissolved, add the mint leaves to the pot, stir to combine, remove from heat, and set aside to steep and cool.
Make the orange tea
Add 5 cups of water to a medium-sized pot and bring to a boil on medium-high heat. Reserve the last cup of cold water.
Squeeze the oranges to make about one cup of juice. Set aside.
Add the loose tea to a tea sock or infuser and secure.
Once the water is boiling add the tea sock to the pot and remove from the heat.
Allow to steep for 8-10 minutes, depending on your desired strength.
Remove the tea sock and pour the tea into a pitcher. Add the cold water and orange juice and allow to cool to room temperature.
Put it together into orange mint iced tea
Remove the mint leaves from the simple syrup and pour the syrup into the orange tea.
Stir to distribute the syrup.
Add ice to tea glasses or directly to the tea pitcher.
Pour and serve. Garnish with orange twists and mint leaves, if desired.
New Year Tea
Mid-February marks the beginning of a new year according to the Lunar New Year celebrations in China and Vietnam. On the first day of the new year, the young pay tribute to their elders by brewing and serving a sweet black tea dotted with dried fruits. This version of the New Year tea uses light sweetness and whatever dried fruit suits your fancy.
Inspired by the tea ceremonies of the Lunar New Year, you can make this sweet and warming tea with your favorite dried fruit.

Mid-February marks the beginning of a new year according to the Lunar New Year celebrations in China and Vietnam. On the first day of the new year, the young pay tribute to their elders by brewing and serving a sweet black tea dotted with dried fruits.
This version of the New Year tea uses light sweetness and whatever dried fruit suits your fancy.
Enjoy with our Vietnamese Iced Coffee cookies on the side.
Gather your ingredients
Serves two
2 tsp dried oolong or other black tea
2 cups of water
2 tsp brown sugar
1/4—1/2 cup of your favorite dried fruits, cut into slices if large. We like apricots and plums, but any dried fruit will work here.
Tea Sock or tea brewer
Make your tea
Rinse and dry your dried fruit, if needed.
In a teapot, kettle, or saucepan, bring 2 cups of water to a boil.
In two tea cups, add 1 tsp of brown sugar to each.
Place 1 tsp dried tea leaves each in two tea socks or brewers and place into the tea cups with the sugar
Once the water is boiling, add half of the dried fruit to each cup and divide the hot water into the cups.
Steep for three-five minutes, to your desired tea strength, then remove the tea sock or brewer.
Let cool to taste, then enjoy!
Mexican Spiced Coffee
Traditional Mexican Spiced Coffee, known as Café de Olla, is often made in a tall clay pot with a Mexican brown sugar called piloncillo or panela. Our version substitutes dark brown sugar to mimic the caramely richness of the original with pantry staples. Of course, if you can get your hands on the piloncillo, even better!

Looking for a steamy, sweet and spicy pick-me-up on a winter afternoon? Trying to think beyond the hot chocolate? This rich mix of dark coffee, brown sugar and spice might fit the bill.
Traditional Mexican Spiced Coffee, known as Café de Olla, is often made in a tall clay pot with a Mexican brown sugar called piloncillo or panela. Our version substitutes dark brown sugar to mimic the caramely richness of the original with pantry staples. Of course, if you can get your hands on the piloncillo, even better!
Gather your ingredients
Makes two cups
2 cups of water
4 tbsp of dark brown sugar (to better mimic piloncillo, you can mix in a few drops of molasses)
1 cinnamon stick
1 whole clove
1/4 cup ground, dark roast coffee
Make the Mexican Spiced Coffee
In a medium pot, heat 2 cups of water with the brown sugar, cinnamon stick, and clove and bring to a simmer, but not a boil. Stir until the brown sugar is dissolved.
Simmer for 5 minutes and then remove from the heat and the coffee.
Allow the coffee to steep for another 5 minutes.
Strain through a CoffeeSock filter and pour into two cups.
Enjoy as is, or with a splash of milk, a dollop of cream, or even a shot of rum if it’s happy hour.
Holiday Wassail
Enjoy this traditional spiced apple punch warm from the stovetop or slow cooker. Fill a thermos full and take your crew out wassailing to celebrate the coming of the new year.
Enjoy this spiced apple punch warm from the stovetop or slow cooker.

The winter holidays—a time of parties, feasting, gift-buying, festivals and sugar (so much sugar!). It seems like it's always been this way, with Christmas making itself seen in shops before December even begins.
Yet in many ancient winter traditions, the season kicked off in just the opposite way—with fasting, contemplation, and rest. As the final fall harvest came in and the nights grew longer, we wintered in our homes until at last the longest night passed and the light began creeping back into the days. And that is when we celebrated.
This is the time of the wassail. Both a noun and a verb, a wassail is a spiced apple punch, often spiked with brandy or whiskey, and served from a communal bowl during a night of wassailing—caroling and merriment meant to celebrate the new year.
There are as many versions of wassail as there are people who drink it. In some cases, a wassail is interchangeable with mulled apple cider. In others, the wassail is tarter, with cranberry or pineapple juice.
You can use our version as a starting place to create your own favorite blend. Enjoy with or without alcohol.
Gather your ingredients
2 medium honeycrisp apples
1 medium navel orange
1 lemon
½ gallon of apple cider
1 mulling spice pack or an equivalent blend of whole spices (cinnamon sticks, anise, cloves, peppercorns, and dried citrus)
10 extra whole cloves
2 tbsp brown sugar
Optional:
½ cup of cranberry juice cocktail or ¼ cup of pineapple juice
Frozen cranberries
Bourbon or brandy
Make the wassail
Push the whole cloves into the skin of the honeycrisp apples
Slice the orange and half the lemon into thin rings and juice the other half of the lemon
In a large pot or slow cooker, add the cider, brown sugar, spice pack, lemon juice, whole apples, and citrus slices
Bring to a boil and then reduce to a simmer and let cook for an hour or more
Taste the wassail and add more sugar if you like, or add additional tart juices
Ladle into mugs, with or without a shot of brandy or bourbon
Maple Sugar Yaupon Tea
If you’re looking to expand your tea horizons, or you’re already a fan of Yaupon, move this simple blend of dried leaves and sugar made from maple syrup to the top of your list. Together, they make fall treat that honors the natural abundance of North America and the indigenous peoples who have been here for centuries.

If you’re looking to expand your tea horizons, or you’re already a fan of Yaupon, move this simple blend of dried leaves and sugar made from maple syrup to the top of your list.
Yaupon tea is the only caffeinated, leaf-based infusion indigenous to the United States. Tribes in the southeastern states have been preparing and drinking this holly leaf brew for centuries. And maple has been sweetening food for at least as long. Together, they make fall treat that honors the abundance of our region.
Learn more about Yaupon in our article, 5 Facts About Yaupon Tea.
Gather your ingredients
Makes two cups of tea with extra maple sugar to spare.
For the maple sugar
2 cups of light maple syrup
A candy thermometer is handy
For the tea
4 tsp dried yaupon leaves
1-2 tablespoons maple sugar
3 cups water
Make maple sugar and yaupon tea
To make the maple sugar
Add the maple syrup to a saucepan over medium-high heat
Boil without stirring until the syrup reduces by half. It will be about 260 degrees on the thermometer. This will take 15-20 minutes. (If it looks like the syrup is going to boil over, it’s OK to give it a quick stir with a wooden spoon.)
Remove from heat. Using a wooden spoon, hand mixer, or stand mixer on medium, mix until the syrup forms large crystals and looks a bit like brown sugar.
Once the sugar is completely cool, you can put it through a sieve or blend it briefly in a food processor to get smaller crystals.
Store the sugar in an airtight container and us in place of sugar.
To make the yaupon tea
In a pot, bring the water to a boil
Add the yaupon leaves to a tea bag or tea sock
Reduce heat to low and simmer for 5 minutes
Remove the tea bag and pour into two mugs
Sweeten to taste with maple sugar
Pumpkin Spice Latte (Hot or Cold)
Celebrate the great pumpkin with this lightly sweet, hot or cold coffee treat. We swap the sugar for maple syrup to give it extra fall vibes. Tis the season!

It’s that time of year when pumpkin shows up in every conceivable product. From the obvious choices (Donuts! Cookies! Coffee!), to the questionable (Body wash? Trash bags??), there’s a pumpkin spice version on the shelf.
It makes some sense here in the Americas where pumpkins grow giant and abundantly in the fall. We can imagine the earliest harvesters of the massive gourd trying to figure out what to do with all of that treasure. We suspect the first pumpkin spice tea was brewed in or around October 1622 by someone who just could not eat another mashed pumpkin with pumpkin bread.
The thing is—we should consider ourselves lucky. We really dodged a turnip. In the ancient tradition of Samhain, the Celtic people carved turnips to ward off spirits. And we give thanks to the great pumpkin that we do not now live in a world of turnip lattes and danishes.
That’s a reason to celebrate with a couple of pumpkin spice lattes!
Gather your ingredients
Makes 2 lattes
For the pumpkin spices
Combine these spices together in a small bowl, adjusting the amounts to your personal preferences. You’ll need 1 tbsp of the combined spices for this recipe.
1 tsp ground cinnamon
1 tsp ground cloves
1 tsp ground allspice
2 tsp ground ginger
1/2 tsp ground nutmeg
For the latte
1 cup of milk (we recommend oat milk or full-fat dairy, you’re going for creamy here)
2 tsp of pumpkin puree
1 tbsp maple syrup
1 tsp of vanilla
1/4 cup strong coffee (cold or hot brewed)
Make your lattes
In a small pan over medium heat, warm the milk, pumpkin puree, maple syrup, vanilla, and 1 tbsp of spice blend, stirring until everything blends up nicely. You don’t want the milk to boil, so turn down the heat if it gets past a simmer.
For hot lattes, pour hot coffee into two mugs and stir 1/2 the milk mixture into each.
For cold coffees, remove the pan from the heat and let the milk mixture cool slightly, then pour the cold brew directly into the pan to cool things down further. Fill two glasses about half way with ice, and pour the lattes into the the two glasses.
Top with any remaining spice blend.
Fresh Herb Bundles (Bouquet Garni)
Preserve summer’s herb bounty for up to six months in the freezer. Toss these herb bundles into soups, stews, teas or even the bath.
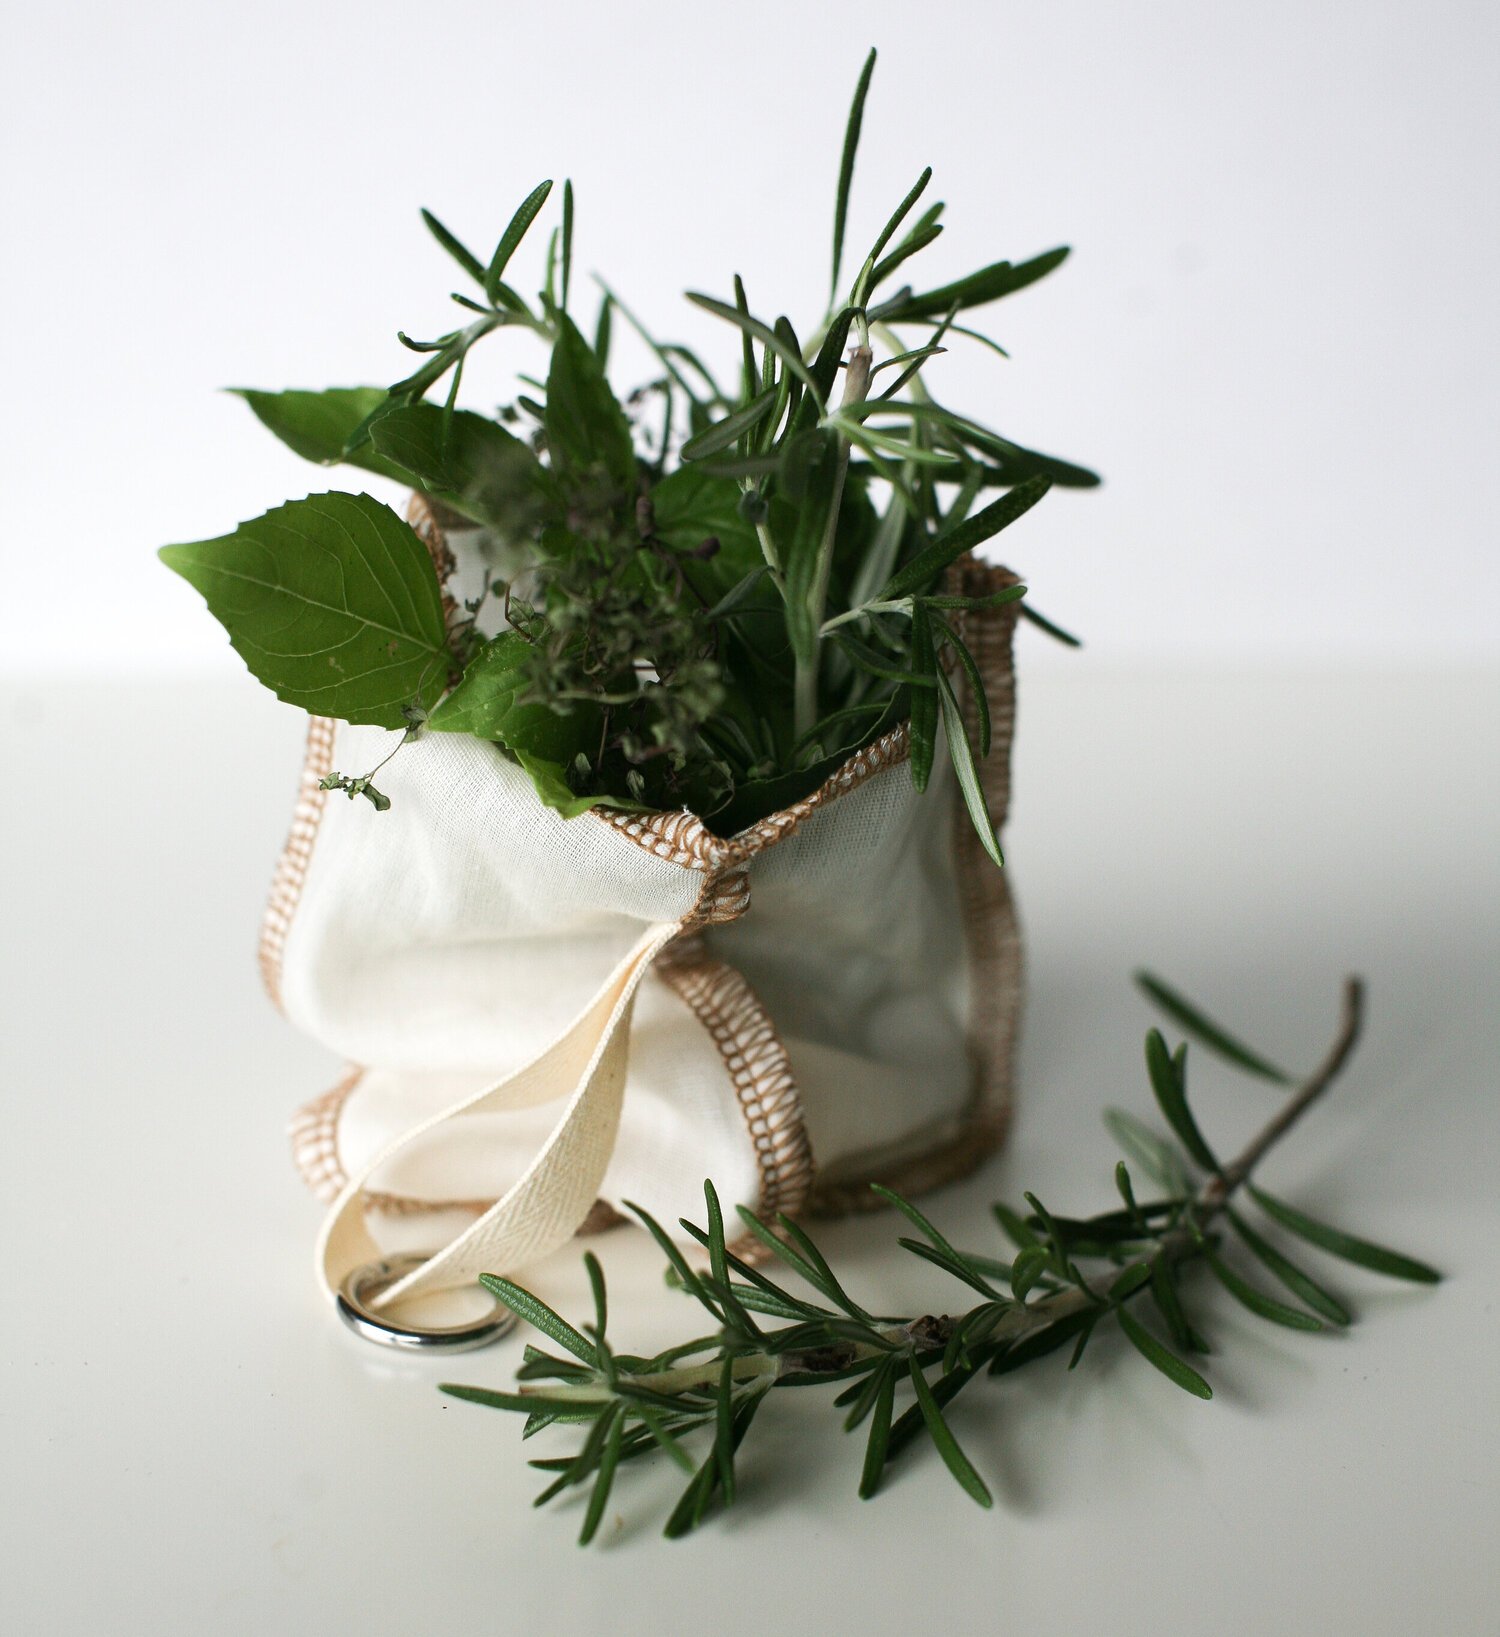
Bouquet Garni
Preserve summer’s herb bounty for up to six months in the freezer. Toss these herb bundles into soups, stews, teas or even the bath.
Herbs are magic. They are the stuff of flavorful foods, calming teas, cleansing incense, and healing balms. You can use them straight off the plant, chop them into chimichurri, blend them into pesto, or dry them for any number of hot beverages, tinctures, oils, and baths.
Herbs are plentiful and cheap and elevate everything they touch.
Truly herbs are a wonder of the world.
As summer tosses these riches at us in abundance, we like to preserve as much as possible to use all year long. You can dry them, of course (and we show you how here). But you can also preserve fresh herbs for longer than you think.
Meet the bouquet garni—a classic seasoning bundle used in French cuisine to infuse flavor into soups, stews, sauces, and other dishes. It typically consists of fresh herbs, aromatics, and sometimes spices, all tied together in a sachet.
You can follow our basic recipe for a classic bouquet garni, but feel free to experiment with whatever you have on hand. Toss these babies in the freezer to use for months.
Gather Your Ingredients
This recipe makes a single bouquet. Have a bunch of herbs? Make lots and store extras in the freezer for up to six months.
4-6 sprigs of fresh thyme
4-6 sprigs of fresh parsley
1-2 bay leaves
4-6 sprigs of fresh rosemary
4-6 sprigs of fresh tarragon (optional)
1 small leek or 1 onion (optional)
1 garlic clove (optional)
CoffeeSock bouquet garni infusion bag or 6x6 square of cheesecloth or muslin (you’ll need twine to close the cloth)
Make Your Bouquet Garni
Prepare the herbs: Wash and thoroughly dry all the fresh herbs, but no need to chop them up! The stems add flavor, too! If you’re adding a leek or onion, peel and cut it into quarters. If using garlic, peel and crush it.
Prep your infusion bag: Open your infusion bag or lay out your square of cheesecloth.
Arrange the herbs: Add the thyme, parsley, bay leaves, rosemary, and any optional herbs you're using to the filter bag.
Add aromatics (optional): If you’re using the leek or onion and garlic, add them on top of the herbs in the center of the bag.
Tie it off: Wrap the tie tightly around your infusion bag and slide the metal ring over the top. If you’re using cheesecloth or muslin, gather the edges, creating a bundle around the herbs. Use kitchen twine or butcher's twine to tie the bundle securely.
How to Use the Bouquet Garni
You can toss your bouquet garni directly into any soup, stew, tea, or bath your heart desires. Just throw it right in! You don’t even need to thaw it if it’s frozen.
When you’re done cooking or steeping, pull the bouquet out, let it cool down, open it up and compost the used herbs. You can simply rinse your infusion filter in hot water, then hang it to dry and reuse. Or, if you used it in a particularly flavorful dish, you can boil the filter in water for a few minutes with a teaspoon of baking soda.
Vanilla Sweet Cream
This thick and lightly sweet cream can be made with dairy or plant-based coconut cream. And you can layer in any flavor your later-summer dreams throw at you.
This thick and lightly sweet cream can be made with dairy or plant-based coconut cream. And you can layer in any flavor your later-summer dreams throw at you.

I’m a black coffee girl, and 95 percent of the time, it’s cold brew cut with a little water. Summer, fall, winter, morning, or 2 pm—doesn’t matter. When I’m in the mind for a kick of coffee, I like the bite of an unadorned brew.
Mostly. Usually. But not always.
On some afternoons, the call of coffee runs right up against a yearning for something sweet and creamy. And while my favorite chocolate peanut butter cold brew smoothie might fit the bill, sometimes I want to keep it simple.
Enter this easy-to-make sweet cream. It’s ready in minutes and a healthy dose stirred into a few ounces of cold brew hits just the right note.
This recipe is the perfect platform for play. Add cinnamon, cardamom, maple syrup, or your favorite go-to flavors for a choose-your-own-adventure treat.
Gather your ingredients
2 tsp simple syrup (recipe below—it’s just sugar and water)
½ cup half-and-half or coconut cream (the thick cream and not the watery milk)
1 tsp vanilla extract
Optional extras: ¼ tsp of ground spices; 1 tsp or maple syrup; or 1 tbsp of cocoa powder
Make the simple syrup, if needed
Don’t have simple syrup on hand? It’s a fuss-free way to sweeten iced tea or cold brew without a bunch of undissolved bits floating around the glass. In short, it’s a game changer.
This quick recipe will make more than you need for your sweet cream. You can store the extra in a mason jar, a squeeze bottle, or a fancy glass decanter with a pour spout. Leave it right on the counter for easy sweetening.
Combine ½ cup sugar and ½ cup water in a small saucepan. Give it a stir to combine.
Heat the pan over medium until, stirring just until all the sugar dissolves. No need to boil or simmer here. Just dissolve the sugar.
At this point, you can add in any of the optional extras mentioned above if you want your sugar to be flavored. You can also not do that and add the flavorings to individual glasses later.
Allow the syrup to cool and pour it into your container of choice.
Make the sweet cream
Combine the cooled simple syrup, coconut cream or half and half, vanilla, and any extras to a small bowl.
Beat with a whisk or hand mixer until it thickens and all ingredients are incorporated.
Taste and adjust the sweetness and flavors to your liking.
Store your cream in an airtight container in the fridge and scoop it out a dollop at a time. It should stay fresh and tasty for about 5 days.

CoffeeSock® ColdBrew filters are durable and may last a year or more. CoffeeSock® ColdBrew filters are a reusable alternative to paper filters and nylon sacks. All of our filters out-perform any comparable disposable and reusable filters. Cotton absorbs some of the oils released from coffee beans yet lets acids pass through. The resulting cup is clear crisp, rich and robust with all the acid of paper brewed coffee, without the paper taste, and all of the richness of French press without the heavy oiliness. CoffeeSock filters are made with Certified Organic Cotton. Cotton imparts no flavor on the finished brew unlike paper. Cotton is 90% cellulose, which is a tasteless and odorless compound that is insoluable in water. Wood is 40-50% while Hemp is approximately 45% cellulose.
(Suggested Soak: 8-10 hours)
Manufactured in the USA
Easy cleanup - Just empty grounds, rinse, and hang to thoroughly dry.
High quality and less expensive than many market alternatives.
Made from Organic Cotton - a responsibly produced, renewable resource.
Care and Handling - Handle like you would other kitchen equipment, but avoid detergents. After brew is complete, remove grounds from filter. Do not allow grounds to remain in filter longer than is necessary to fully drain. Evert filter and brush away most of remaining coffee grounds. Rinse filter well, wring out excess water, and hang to dry.
With time oils will build up in the filters. The oils may be removed by boiling in fresh water. This is also an alternative method for sanitization. Sanitize in the same manner when cross contamination is suspected. Allow filters to dry thoroughly between brews.
Sizes offered:
KIT32- 32 ounce Ball® Mason Jar and CoffeeSock® Cold Brew Filter
*free shipping excluded
Coldbrew BBQ sauce
Whip up some cold brew-spiked barbecue sauce as a marinade, dipping sauce, or to slather on all things grilled. It will turn your tofu or chicken into something worthy of sharing with your favorite people this summer.

Headed to a cookout soon? Tis the season! Around here, some Austnites will wait for hours to get a taste of our locally famous BBQ slingers, Franklin Barbeque. And no shade to anyone who wants to wait (literally, there’s no shade while you wait, so bring an umbrella). It’ll be worth every second you sit in that line.
But if you don’t live in Austin or prefer something DIY—try whipping up some cold brew-spiked sauce to impress your pals. We can’t claim ours is as stunning as Franklin’s sublime sauce, but it will turn your tofu or chicken into something worthy of sharing with your favorite people this summer.
Gather your ingredients
Don't let the long ingredient list scare you off. This recipe could not be easier. You’ll toss it all in a pot, let it simmer, then puree it.
2 cups cold brewed coffee
1 28 oz can of chopped tomatoes
1 onion, diced
3 cloves garlic, minced
1/2 cup apple cider vinegar
1/2 cup brown sugar
2 tablespoons Dijon mustard
1 teaspoon smoked paprika
1/2 teaspoon chili powder
1 teaspoon cayenne pepper (more or less to taste)
2 tbsp cumin
Salt to taste
Instructions
Place everything except the salt in a large saucepan or pot, and bring to a low boil.
Lower the heat, and simmer for 20-25 minutes.
Remove from heat and allow the sauce to cool.
Taste and add salt if needed.
Puree in batches in a food processor or blender, or use an immersion blender. Blend until perfectly smooth.
Use the sauce as a marinade, and slather it on all things grilled. Happy cookout to you!
Cinnamon Cold Brew Granita
On hot days, we crave a classic, syrup-covered cone served out of the window of a snow-cone truck. Making them at home means we can have custom flavor options and keep the ingredients a bit more natural. This recipe requires no fancy equipment—you only a few hours of freezer time and a fork!

As the sunny days roll in around here, we start craving snow cones and shaved ice treats. And while we love a classic, syrup-covered cone served out of the window of a snow-cone truck, making them at home means we can have custom flavor options and keep the ingredients a bit more natural.
Unless you have a shaved ice machine or a really fancy blender, it’s not that easy! Until I learned how granita is made! No fancy equipment necessary. You just need time, a little patience, and a fork!
This recipe is endlessly flexible—swap the cinnamon for chocolate syrup or vanilla, change the ratio of coffee to water, or add a splash of your favorite milk. It’ll be the best coffee break you’ve taken all year!
Gather your ingredients
3 cups cold brew concentrate or strong-brewed cold brew coffee*
1 cup of water*
1/2 cup granulated sugar
2 teaspoons ground cinnamon
Whipped cream (optional, for serving)
Cinnamon sticks (optional, for garnish)
Make the granita
In a small pot on the stove, heat the water until just hot enough to dissolve the sugar.
Add the sugar and stir to dissolve, then add the cinnamon and stir that in too. Remove from the heat and set your cinnamon sugar water aside to cool.
Once the mixture is cool, stir in the cold brew and pour the mixture into a loaf pan, spreading it evenly.
Place the pan in the freezer, loosely covered with foil or plastic wrap, and let it freeze for about 1 hour, or until the edges start to get icy.
Using a fork, gently scrape and stir the mixture to break up any ice crystals. Make sure to focus on the edges and corners, since those freeze first.
Return the pan to the freezer and repeat the scraping process every 30 minutes for about 3 to 4 hours, or until the entire mixture has become the texture of shaved ice.
Once the granita is fully frozen, remove it from the freezer. Use a fork to fluff and break up any large ice chunks.
Serve your granita in chilled glasses or bowls. We wouldn’t object to a cinnamon/sugar-rimmed glass.
Add a dollop (or three) of whipped cream.
** If you’re making cold brew concentrate with our classic recipe, then the 3:1 concentrate-to-water ratio will make a strong coffee-flavored treat. Adjust the water and cold brew amounts to get the flavor just right for your brew method.

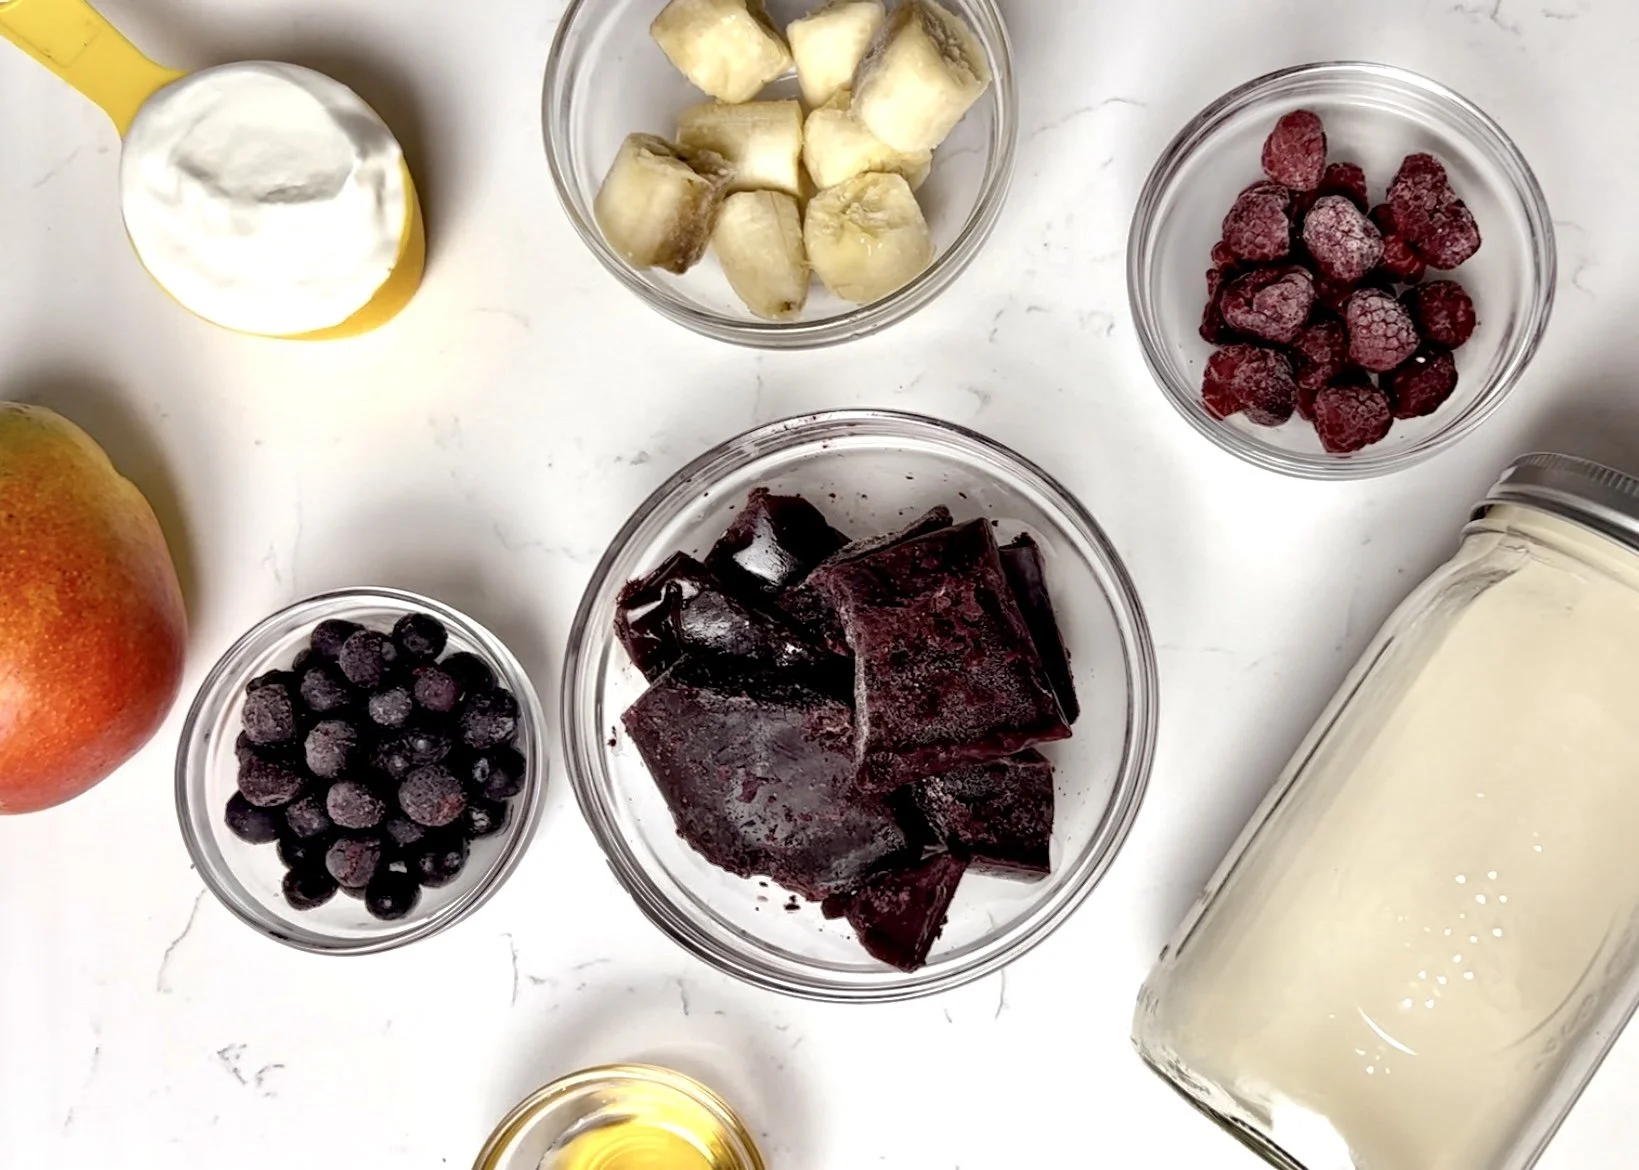
Acai Bowl with Homemade Oatmilk
If you're looking for a delicious and healthy breakfast or snack option, making an acai bowl at home with homemade oat milk is a great choice. Acai bowls are a popular Brazilian dish that features a thick, smoothie-like base made with frozen acai berries and topped with a variety of nutritious ingredients like fresh fruit, granola, and nuts. Making your own oat milk ensures that your acai bowl is dairy-free and packed with nutrients. Not only is this a fun and easy recipe to make, but it's also a great way to start your day off on the right foot.
If you're looking for a delicious and healthy breakfast or snack option, making an acai bowl at home with homemade oat milk is a great choice. Acai bowls are a popular Brazilian dish that features a thick, smoothie-like base made with frozen acai berries and topped with a variety of nutritious ingredients like fresh fruit, granola, and nuts. Making your own oat milk ensures that your acai bowl is dairy-free and packed with nutrients. Not only is this a fun and easy recipe to make, but it's also a great way to start your day off on the right foot.
Here’s how to make this delicious treat:
Gather your ingredients
Makes a large acai bowl
For smoothie base:
2 packets of unsweetened acai puree
1/2 cup of frozen blueberries
1/2 cup frozen raspberries
1 frozen banana sliced
3/4 homemade oatmilk made with the CoffeeSock NutMilk Kit
1/2 cup plain greek yogurt
1 tbsp agave syrup
For the toppings (optional):
1/2 mango sliced
1/4 cup of granola
1/2 banana

Add 3/4 cup of oatmilk and 1/2 cup of yogurt and blend on high.
Once smooth add in all the berries, banana, acai puree, and agave and blend on low until smooth and thick.
Pour the smoothie blend into a bowl and add your toppings to the top.
Enjoy!

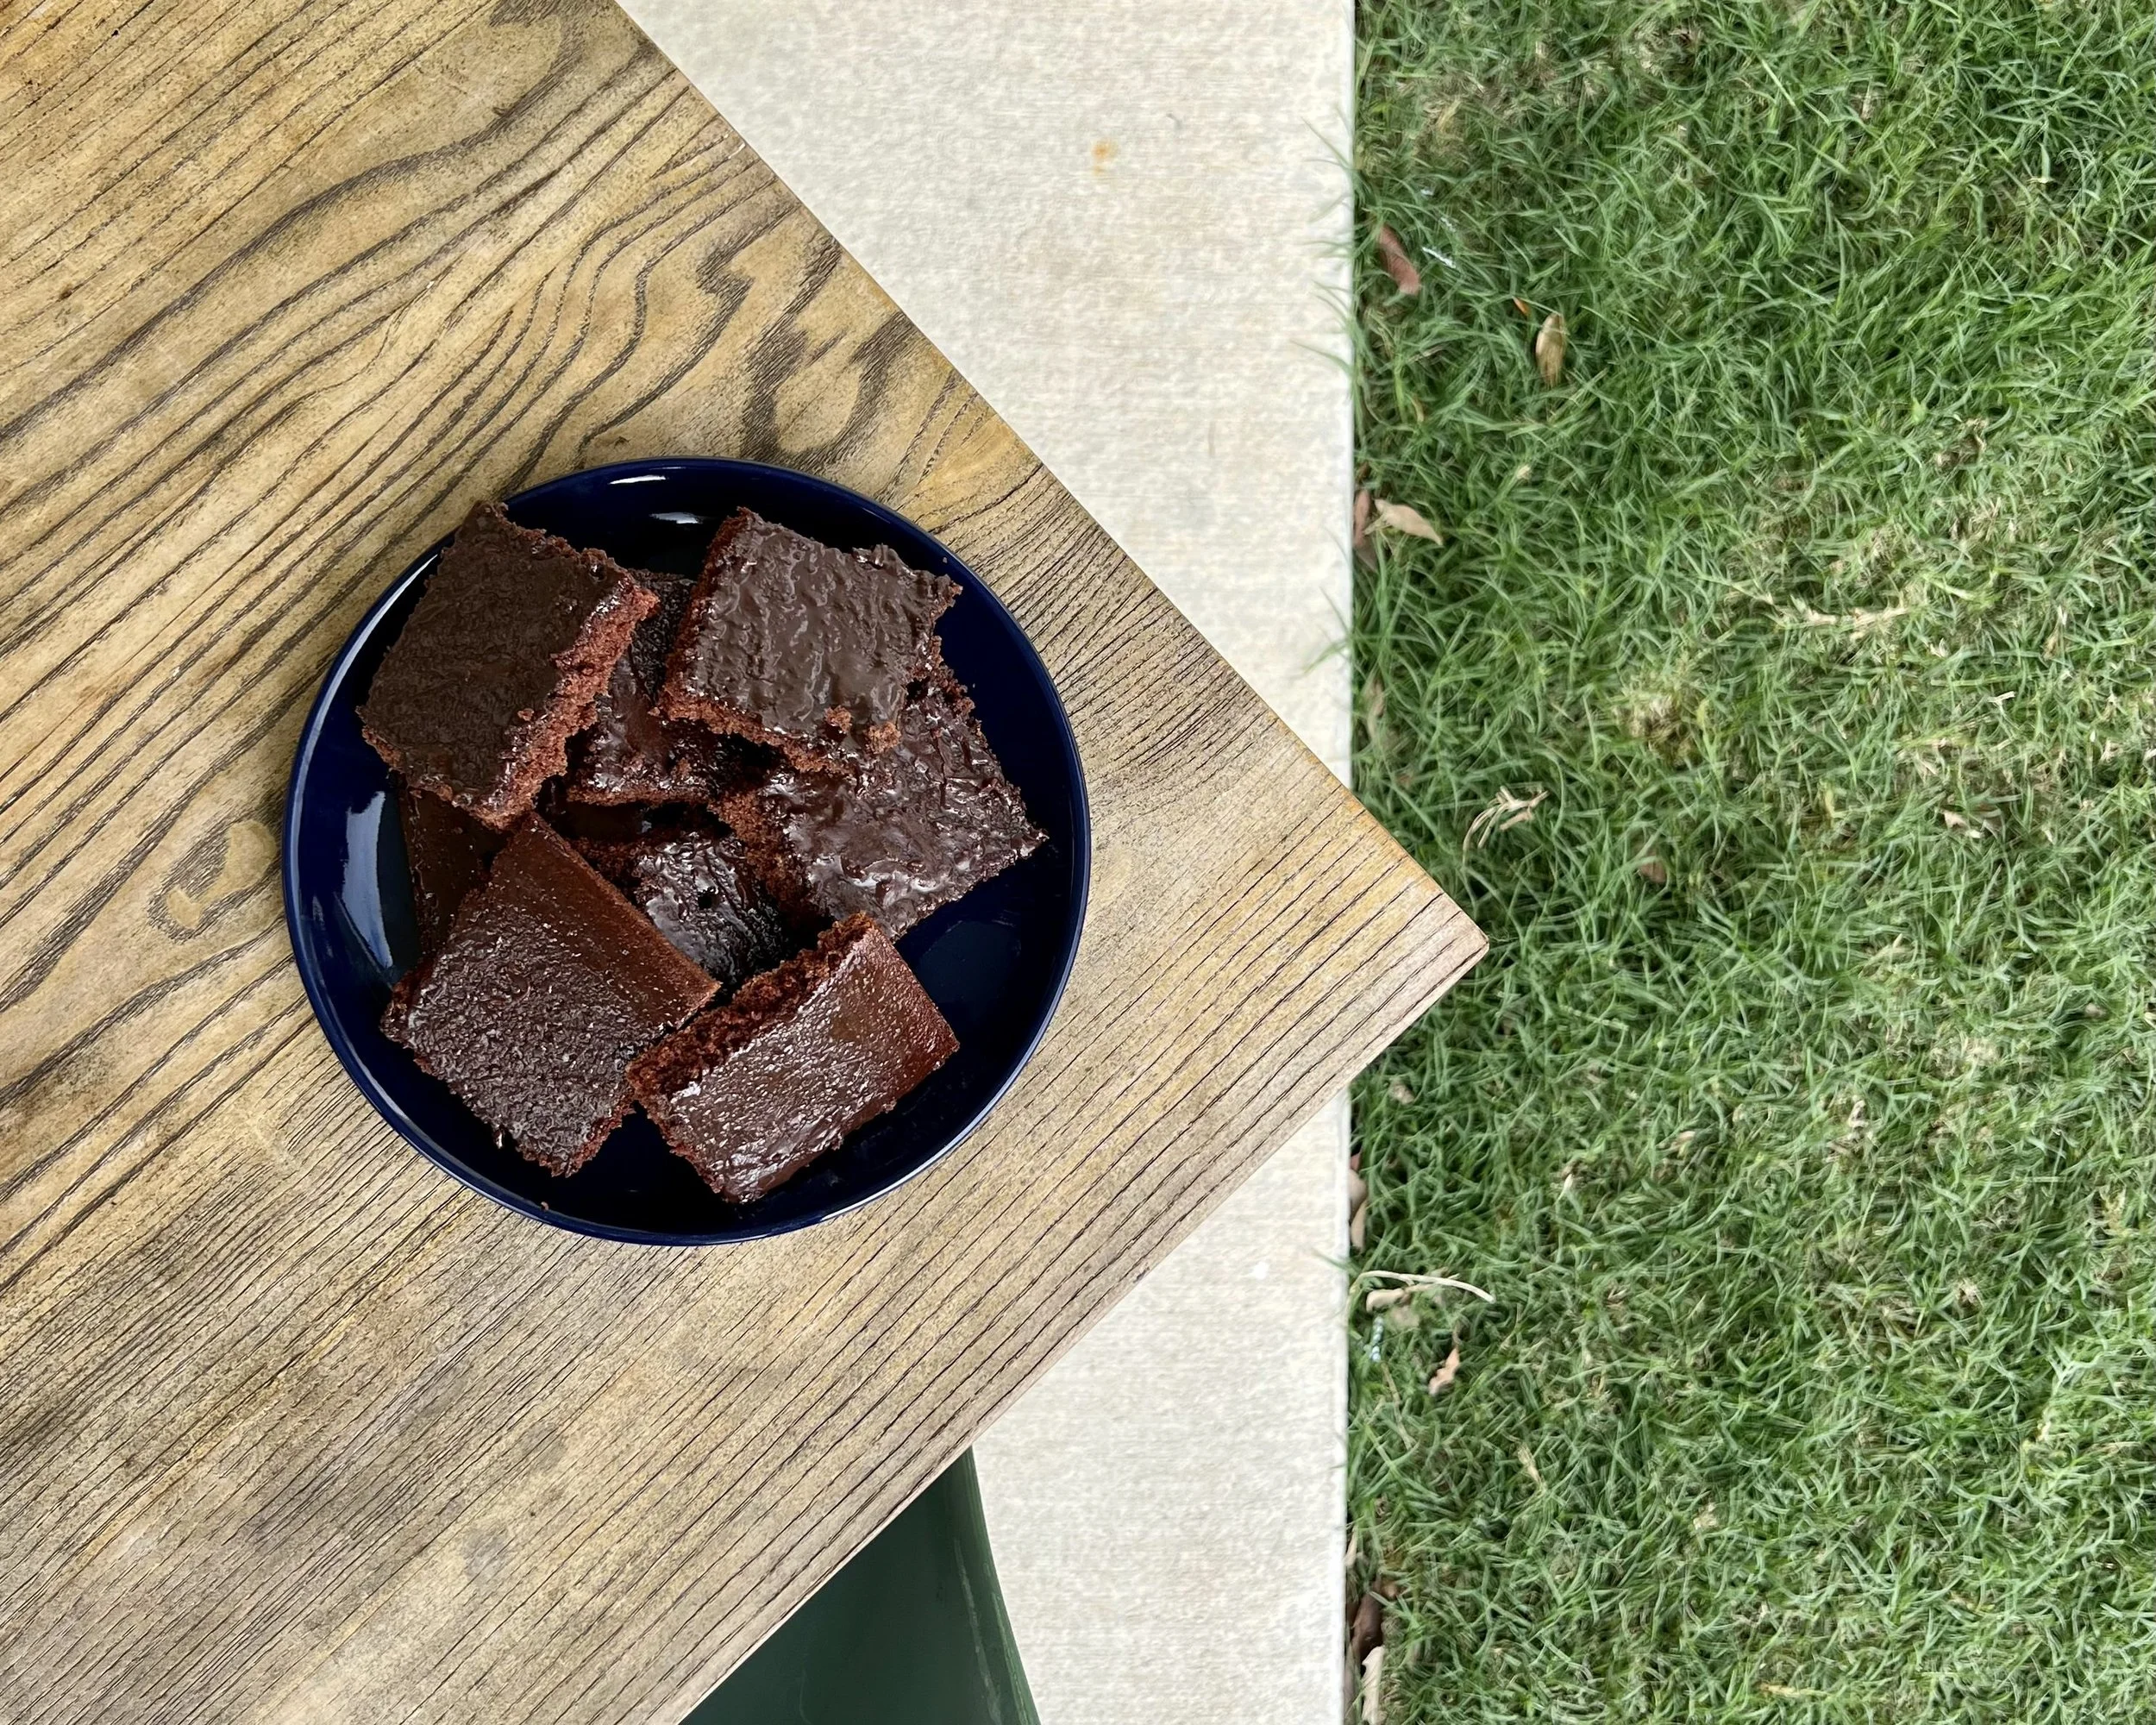
Coffee-infused Brownies
Indulge in the irresistible goodness of these decadent brownies that boast a moist crumb, thanks to the buttermilk, and a luscious topping of boiled cocoa and butter frosting. Elevating the classic dessert to new heights, this recipe packs a punch of sophistication with a hint of freshly brewed strong coffee.
Indulge in the irresistible goodness of these decadent brownies that boast a moist crumb, thanks to the buttermilk, and a luscious topping of boiled cocoa and butter frosting. Elevating the classic dessert to new heights, this recipe packs a punch of sophistication with a hint of freshly brewed strong coffee.
Here’s how to bake these delicious brownies:
Gather your ingredients
Makes a sheet tray of Brownies
For the Brownies:
2 cups all-purpose flour
2 cups sugar
1/2 cup unsalted butter
1/2 cup olive oil
1 cup brewed strong coffee made with CoffeeSock
1/4 cup unsweetened cocoa powder
1/2 cup buttermilk OR (1/2 cup of milk + 1/2 tsp of lemon juice OR white vinegar mixed together)
2 large eggs
1 teaspoon baking soda
1 teaspoon vanilla extract
For the Frosting:
1/2 cup unsalted butter
2 tablespoons unsweetened cocoa powder
1/4 cup milk
1 1/2 cups powdered sugar
1 teaspoon vanilla extract

Preheat the oven to 400 F and lightly grease a large sheet pan.
In a large mixing bowl, combine the flour and sugar.
In a heavy saucepan over medium heat, combine the butter, oil, coffee, and cocoa. Stir constantly until heated to a boil.

Pour the boiling mixture over the flour and sugar.
Add the buttermilk, eggs, baking soda, and vanilla. Mix well, using a wooden spoon or high-speed mixer.
Pour the batter into the prepared sheet pan

Bake for about 20 minutes, or until a toothpick comes out clean.
Meanwhile, prepare the frosting by combining the butter, cocoa, and milk in a saucepan over medium heat.
Stir frequently until heated to a boil.
Mix in the powdered sugar and vanilla and stir until smooth and turn off the heat.
Pour the warm frosting over the brownies as soon as they come out of the oven.
Cool and cut into squares.

Enjoy!